Quickstart Guide
Use this guide if you're new to Firezone or just want to get up and running quickly with the some of the most common configuration options.
Prefer to set things up programmatically? The REST API guide walks through these same steps using the Firezone REST API.
After following this guide, you'll end up with a Firezone deployment that looks similar to the following diagram:
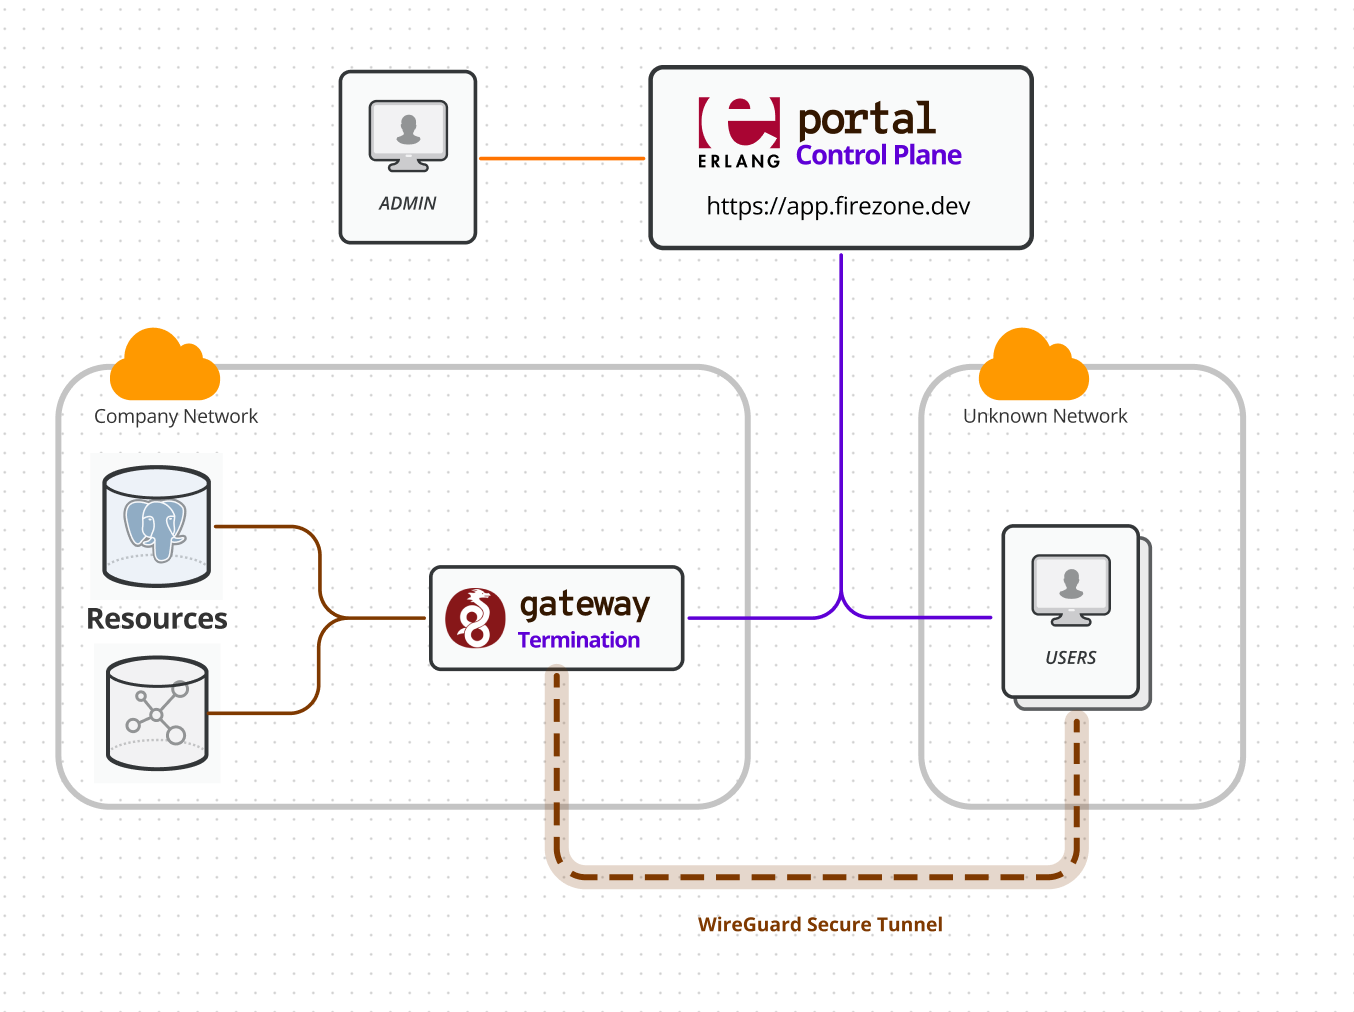
This quickstart guide illustrates a simple Firezone setup. Firezone supports more complex deployments than the diagram illustrated above, but by starting with the basics laid out here you'll get a better sense for how to deploy Firezone for your specific use case.
You'll be able to change everything covered in this guide later, so don't worry if you make a mistake or two.
Prerequisites
- Firezone account. Don't have an account? Sign up.
- Resource you want to give users secure access to (e.g. prod server, database SaaS application, or subnet)
- Server or VM you're able to deploy a Docker container or Linux binary on that can connect to both the Resource and the internet
Summary
- Sign in to your Firezone Admin Portal (e.g.
https://app.firezone.dev/example_company) - Create a Site - Sites are where admins manage Resources, and Gateways that enable access to those Resources (e.g. US-West, Chicago-office).
- Deploy a Gateway - Gateways are Site-specific, and provide connectivity between the Firezone Client and Resources in a Site.
- Add a Resource - A Resource is anything you'd like to give users secure access to (e.g. a server/VM, database, subnet).
- Create a Policy for each Resource - A Policy defines which user-groups can access a Resource (note: access is default-deny, which means a user can't access a Resource until a Policy permitting access is created).
- Download the Firezone Client
Instructions below follow the same order as the summary above. If you follow the instructions sequentially from top to bottom, you should end up with a working Firezone network that looks like the architecture diagram at the top of this guide.
Signing In
In your browser, visit your unique sign-in URL, which can be found in the Welcome to Firezone email you received after you created your account. Once on the sign-in page, enter your email and click the sign-in button. You'll receive another email with a sign in link and token. You may either click the link to be signed in automatically on the device you're using, or copy the token value and enter it in to the form on the sign-in page.
Create a Site
When you log in to the admin portal, you'll be taken to the Sites page. The
first step will be to create a Site by clicking the 'Add Site' button. We'll
auto-generate a name for the Site, but you should consider renaming it something
relevant like Production, US-West, or Chicago-office.
After the Site is created, you'll be forwarded to the Site Details page where you can continue the setup process.
Deploy a Gateway
Gateways run on your infrastructure (server, VM, etc.) and must have access to the internet as well as the Resource you'd like to share via Firezone.
Clicking Deploy a Gateway on the Site Details page will give you two options
for deploying a Gateway: Docker or systemd (choose whichever method you
prefer, and follow the instruction on that page).
When a Gateway has been successfully deployed, you will be redirected to the Site Details page where the Gateway will now be listed and shown as online.
Add a Resource
A Resource is simply anything the Gateway can reach that you'd like to give users access to. Examples include servers, databases, applications, and even entire subnets.
The more granular you can be with your Resources, the more control you'll have over who can access them.
On the Site Details page, click on the Add Resource button. You will now be
able to enter the name and address for a Resource. The name can be
anything you choose, and the address must be one of the following:
- IP address (e.g.
10.1.2.3or2001:db8::1) - Fully Qualified Domain Name (FQDN) (e.g.
example.com) - CIDR Range (e.g.
10.10.10.0/24or2001:db8::/48)
Optionally, you're given the option to provide an Address description which,
if provided, will be what's shown as the Resource address in the Clients when
users sign in.
After adding a Resource, you'll need to create a policy authorizing one or more user-groups to access that Resource. End-users cannot access a Resource unless they are members of a group that has explicit access to that Resource.
Create a Policy
Navigate to the Policies page by clicking the Policies button in the left-side menu bar. Select a Resource, and choose which groups can access that Resource. Save the Policy.
Install the Firezone Client
When you're finished in the Admin Portal, end-users can connect to available Resources by installing the Firezone Client for their platform, and signing in.
After installing the Client, you can sign in by tapping Sign in (mobile clients) or clicking Sign in from the menubar dropdown (desktop clients) and entering your Account slug in the sign in form.
You now have secure access to Resources shown in the Resources section.
Need help? See all support options.